
Around 3 months ago we announced the big update – our technology-agnostic indoor-outdoor wayfinding was released as a private beta. We were overwhelmed by the interest towards the feature (we got on front page of Product Hunt!), and got a selection of excellent venues and developers as beta testers. For the rest of you, who have not experienced the tools yet first hand, we complied this update to summarize all the goodness that is going to be included in our wayfinding and maps layer that is going the be released officially early next year.
For us, simplicity and scalability are the key questions in everything we provide. Getting indoor positioning to work inside one standard office space is one thing, but building a tool that can be applied to any venue type of any size, and that functions indoor-to-outdoors and between buildings is whole other topic. Outdoor maps and wayfinding have existed for centuries. We have conventions for how to visualize roads, buildings, water, churches etc. How does this all translate to indoor spaces? This year, we have been going through and creating new standards for indoor navigation, through looking at Open Street Map conventions, testing out different scenarios, and working together with customers in different types of venues in figuring out the best practices for wayfinding. This is what the our extremely robust wayfinding is going to look like:
Paths vs walls
There are two approaches what it comes to indoor navigation: drawing the walls vs drawing the paths. We thought for a long time, which approach is more beneficial from the setup and end user perspective. The benefit of the walls model is that it mimics the real world.As a pedestrian you may walk however you wish inside the building – back and forth, cross a room or all around as you want. You are not forced to stay on covered, direct roads as cars are. However, the things is, when you are looking for the shortest route to a place, you want to be guided on a direct, shortest path to your destination.
The top reasons why we decided to go for the model, where you only draw the possible paths a visitor can walk:
- Extremely fast to set up and edit
- Requires no CAD models
- Similar logic followed indoors and outdoors
- Improved positioning accuracy, when positioning is forced on the paths
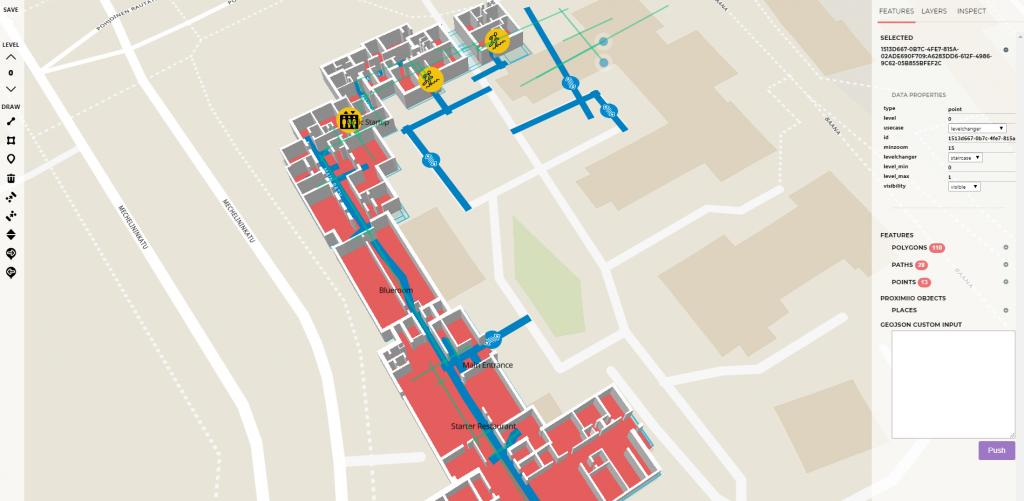
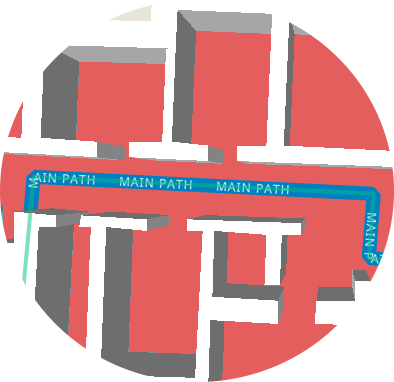
The route formatting is done by clicking on our portal on top of the floor plan. It only takes about 10 minutes for one medium-sized floor. If there’s ever a need to update this, it’s all done through the cloud. For the sake of clarity, we recommend keeping your routes parallel or perpendicular to the building’s walls. 90-degree angles will give you the clearest walking directions. Remember to exaggerate your path crossings a bit to ensure that the connection is made properly.
As a cherry on top, you can even name your paths. Similarly as outdoor routes have names, you can give names to your indoor paths. This is simply something that existed in the OSM data hierarchy for outdoors, so we transferred it to indoors. I’m yet to see venues that would have named their indoor walkways in real life, but perhaps this will start a new convention. Who would not want a corridor at their office named after them? These names will make your wayfinding instructions clearer.
We have even added a route preview tool in the portal, which allows you to check if you have connected all the routes properly. This is an extremely handy tool – something we found out in the very first setup we did.
Moving between floors
To enable the floor changes, the first thing is to number your floors correctly. The ground floor is level 0 (important for the connection to the outdoor routes!), and you can go both below and above from there.
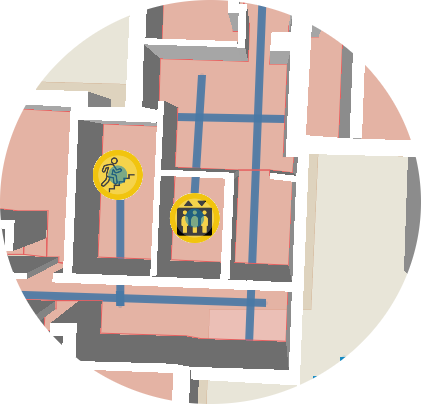
When you are building the digital wayfinding setup for your building, you need to think like the architect, who designed building in the first place. How are the visitors going to move between the different floors? Naturally, like in the real world, there needs to be stairs or an elevator to enable a connection between the floors. That is also how we are enabling it. You need to add a symbol for stairs or elevators to the correct spot on the floor plan and define the minimum and maximum floor that you can reach by them. Some stairs maybe take you just one floor higher, while other can take you all the way up to the roof terrace. Remember to carefully connect these symbols to the paths you are creating.
Getting more complex – unidirectional routes, half floors
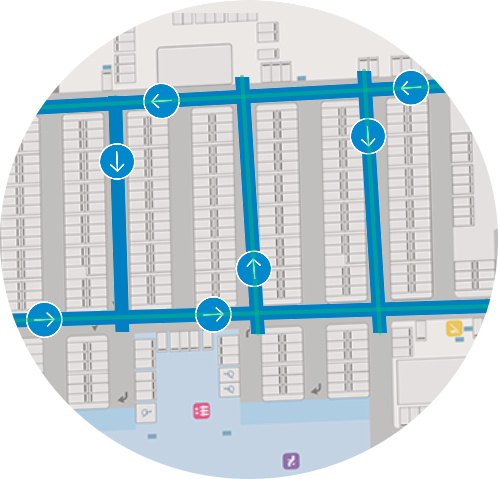
Speaking of floors, naturally elevators and stairs are not the only thing that can be used to move between different floors. The venues we have been piloting at include a shopping centre, and a public transport station, which has been an excellent exercise for the wayfinding. Both venues also include escalators, which are in essence stairs that only go to one direction. That sounds so obvious when you write it in the blog, but it’s not so simple from the wayfinding point of view. For the escalator symbol you may also select, which direction to escalator goes. To be exact, this is also possible for the stairs and elevators symbols, if there should be such curiosities in your building.
For a tech-savvy able-bodied user it might make no difference if you talk about elevators or escalators. You might even consider these details irrelevant. However, these details get very important, when we start providing the wayfinding for a wider audience, including the elderly, visitors in wheelchairs, visitors with other walking difficulties, visually-impaired visitors and so forth. These could be also the same audience that the wayfinding is a more crucial feature at your venue!
Continuing from the unidirectional theme, both the shopping centre and the public transport station include another curiosity – unidirectional paths. This could be either done through gates (payment gates upon entrance to the station) or though unidirectional routes in the parking lot. By default, all the paths you are creating can be used for both ways, but by selecting the route you may specify that it only goes to one way or another. Remember to add all the routes and floor connections to your floor plans – otherwise you will easily end up guiding your visitors to a spot where there’s no (digital) way out.
Another sneaky aspect that took plenty of fine-tuning of the algorithm were half-floors or mezzazines. Think about a shopping centre that has a wide open area in the centre of the ground floor, and the first floor only extends the Northern and Southern wings. Let’s assume that there is no direct path from Northern wing floor 1 to Southern wing floor 1. Before we started testing these types of setups and noticed the faulty logic, our algorithm assumed that humans could just fly across the distance. Talk about good guidance for the visually impaired!
Connecting indoors to outdoors
This is where the wayfinding gets really interesting. You no longer need to look at individual buildings in isolation, but can start looking at complex headquarters consisting of multiple buildings or production sites, university campuses, hospitals, public transport network or even entire cities.
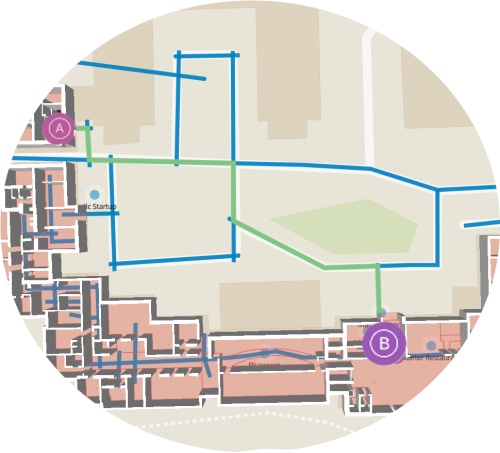
By selecting the path approach, we make it extremely simple to connect the road outside your building to the corridor going inside it. For private areas that are not marked on maps, you can add your outdoor routes using the very same path tool as for indoor paths. As in real life, sometimes the shortest route from A to B means cutting through the indoor garden. The moment you step out from your private areas to public streets, you can connect your private paths to the street structure of the city and the whole world through a connector.
UI helpers
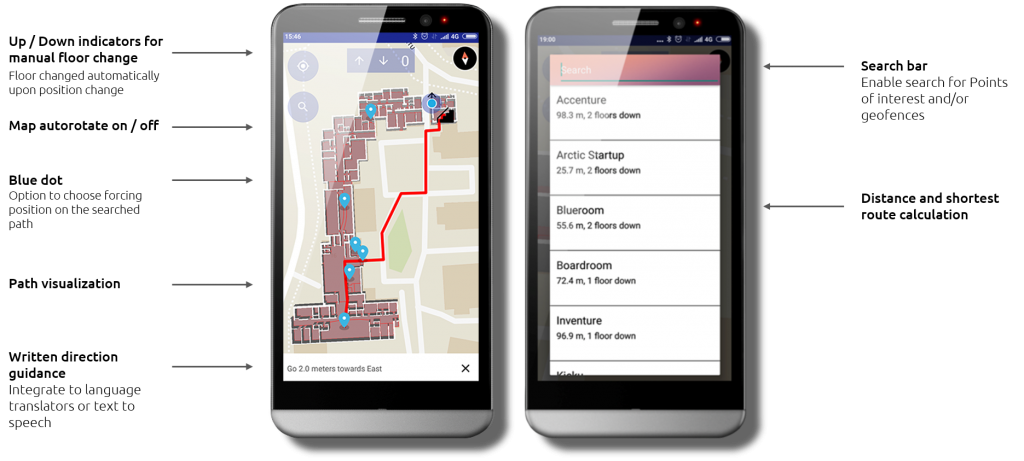
We also noticed that getting the visualization correct in your app is also something developers would like to get a hand for. We have built UI helpers for all the small details for your map view, including the search bar.
Are there some features that you would definitely want to see in the wayfinding tools? Do you have a project that would want to get involved at this stage? We are always looking to improve our tools and features, so give us your improvement suggestions or tell us your interesting project!

Dear proximi
I would like to inquire about the licencing .I have a solution that we are busy with that i would like to use your solution in it
Hi, you can see our pricing model here: https://proximi.io/pricing/. I just emailed you with some more questions, so I can help you in deciding the correct plan.
Hi,
First of all, is this sdk still in use for example for the android platform? I couldn’t find the demo application for android on your github profile.
More importantly, by watching some of your demo videos on yt and by reading this post I got the impression that when calculating the position of the user you can choose whether to force the algorithm to calculate the location as a point on the current path or not to force it ? e.g. here (link1 below) it seems like the position is following the path, while here (link2 below) it seems like the position is freely moving between places. Is this assumption correct?
link1: https://www.youtube.com/watch?v=hZeKZLJZ258
link2: https://www.youtube.com/watch?v=CfVvmBzE4jc
Hi! We are definitely still active. The Github repository is private for Intellectual Property reasons, but we will share it to you once you start your project.
The assumption on forcing to paths is correct. That is something you can decide on on the application level, based on what feels better for your project.